Teaching Arduino to the lil' ones
Maybe you've figured out by now that I like to make blog posts on Thursdays. I'll skip a week or two here & there if I don't have new content or anything prepared, but last Thursday, I simply forgot to post some of my "canned content" due to sheer exhaustion from a week culminating with teaching Arduino to a group of fourth-graders!
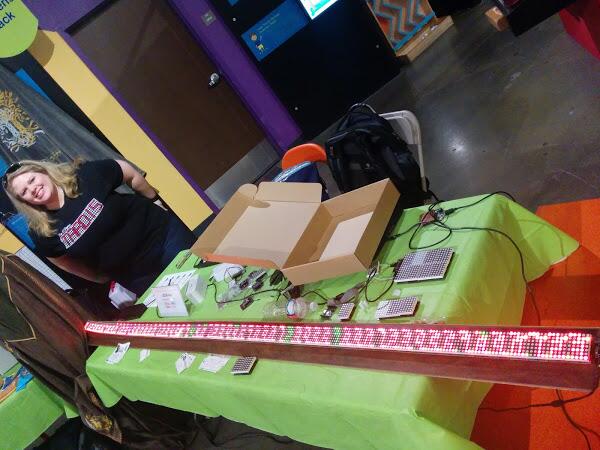
You never know what opportunities will knock on your doorstep from demonstrating at various events around town, and of course, simply showing up to meet people could lead to that million-dollar introduction. As such, we were invited to present LEDgoes at the Frisco Mini Maker Faire back in April, and were busy showing off this:

Making a Difference
You never know what opportunities will knock on your doorstep from demonstrating at various events around town, and of course, simply showing up to meet people could lead to that million-dollar introduction. As such, we were invited to present LEDgoes at the Frisco Mini Maker Faire back in April, and were busy showing off this:
The maximum-length LEDgoes marquee, 64 panels, 8 feet long!
Area educators were on the prowl looking for fun things to engage their students, and one of them just happened to wander by our booth and inquire into the details of our project. We mentioned the boards are based on Arduino microcontrollers, and that got the gears turning: she is looking to build curriculum for 4th & 5th-grade gifted/talented students around Arduino, microcontrollers, and programming. We traded contact info, and eventually scheduled a date for... last Thursday.
It was a bit of an exhausting week for me anyway, as Stacy's car was broken and I needed to shuttle her everywhere too. It's a good thing our office buildings are only about 1/2 mile apart, but she works different hours than I do and adjusting to her wake-up time was not easy. However, I'm blessed to work at a company which allows for up to 4 paid volunteer hours per month, so I took advantage of these paid hours last Thursday to drive to the elementary school with some of my own gear to share and projects to amaze with.
I got a warm welcome from the students on the way in, and jumped in telling them a little bit about myself, what I do, what I'm interested in, and how I got there. I showed them the completed "Inklings of a Project" that I posted here a while back and told them that even though it looks like all the LEDs are on, in fact only one LED among the 104 in the charlieplexed LED array are turned on at any given instant in time. They were, of course, quite fascinated by this, plus by the tiny Bluetooth module I passed around among them (yes, I didn't need to tell these kids what Bluetooth was -- they are started early on technology these days!) There were many more gasps of amazement when I told them to compare how fast you can see things change (less than 30 times a second, usually) to how fast the Arduino's chip can change things: up to 16 million times per second. They were blown away by that, but told them that was nothing: the Asus Eee netbooks they all had in front of them ran much faster, up to a couple billion instructions per second!
The truly smart ones can explain anything to anyone...
Then began the fun part: there is an awful lot that needs to be explained to anyone just starting to learn this stuff, whether you're in fourth grade or even an adult looking for a new hobby. I needed to explain the basics of inputs & outputs on the chip, and how these could be used to read & write data in & out of sensors, lights, or any other electronic widget you can imagine. These kids probably had not been exposed to the concepts of electricity yet (i.e. voltage & potential), so I had to carefully explain how the pins behave, and why they do what they do. The first time I tried explaining electronics to them, I got back puzzled looks across the room -- oh no, time to reformulate! I paused for a couple moments and picked another analogy that would resonate better. Forget about declaring the pins as inputs & outputs: think of them like light switches on the wall. You can flip them on & off as fast as you want. The chip can flip the switch, or another device you connect to the chip can flip the switch. Their faces started lighting up, and so I knew I could proceed. The awkward "What? I don't get it." phase was over.
Now that the chip had been discussed, it was time to demonstrate how the chip would "toggle the light switch." The kids opened up the Arduino IDE and loaded the simple "Blink" example. I walked them through each line of the code, told them what setup() and loop() does, and then had to explain what a loop was. (Actually, the teacher would sometimes jump in and walk the kids through a brief exercise to help shed light on some of these concepts, and the loop was one of them.) Then, I noticed that Blink has some simplistic use of variables, which I'm sure the students would not learn about in math for many years, so I phrased the line "int ledPin = 13" as "the secret word for 13 is LEDPIN; LEDPIN means 13". Once we walked through the code, I had them load it onto the Arduino Unos, and soon, all of them were getting it to blink.
Afterward, I decided to do a little more advanced exercise in variables with them, and engage them further by finding exactly what blink rate can be set before the LED appears to be on constantly. I solicited a name for the variable from among the students, and an initial value. At this point, I needed to explain microseconds to them, as the argument for the delay() function is in milliseconds and they hadn't been introduced to these scientific-notation prefixes yet. To check their understanding, I picked some random values and asked them if the light would blink on & off faster or slower than 1 second, and they seemed to get it. Once we had our variable in place and the value, I had them replace delay(1000) with delay(waitTimer), and experiment with different values of waitTimer to see at what point the LED would appear to be solidly on. They got it down to about 15 milliseconds before it appeared to be solid.
Soon thereafter, the students wanted to experiment with longer delays -- one group tried to set it as 1 billion. I told them that wasn't likely to yield the result they expected, and then tried to explain the concept of binary to them in order to convey why the chip can only store numbers up to a certain value. I even emphasized that in my field, you don't need to know a lot of advanced math like calculus; just knowing how to count in different number systems and your Powers of Two go a long way. For instance, the maximum value for an "int" number on an Arduino Uno is 32,767, or 2^15, because the 16th bit is reserved for the sign (+/-). Any number beyond 32767 would suffer from aliasing, and possibly become negative, due to two's complement. (I didn't dare attempt to explain two's complement to them. :-P) To put this in a base-ten perspective, say the largest number you can hold is 9999 (four places), and you provide it 106531: the system is only going to remember 6531 (the first four places). Later on, for the teacher, I explained how the 16th bit in the binary number representing 1 billion is in fact a 1, thus the processor interpreted that number as some negative value and the kids did not see any delay whatsoever.
At this point, some of the kids had to go off to lunch. Bummer. Some brought theirs back to continue, and then I showed them how to wire up another LED in series with the blinking LED so they could begin to understand the layout of a breadboard. Now I had to teach them which side of an LED is the anode, and which is the cathode, so they could wire Pin 13 into the anode and Ground into the cathode. One of them put the jumpers in backwards, so I simply flipped around the LED on the board and showed them that was perfectly valid too. Voila!
Well, that was about it. I felt like we could have pressed on with more material, but realized they'd probably had enough; what I had already showed them would probably be enough for them to think about for the whole summer.
However, that's not the end of the story: to save you from a bunch of interruptions, I omitted all the times when the kids would blurt out some tangentially-related questions during my talk, including "What college did you go to?", "How much money do you make?", and "What other types of Arduinos are there?" Many times, these questions were tempting to answer, and would lead me down some long tangent; I had to be careful to stay on-topic.
Finally, as standardized testing was over, the teachers pretty much had free reign over the kids to cover additional material, give them extra recess time, or whatever suited their fancy. Some of the kids seemed to be in "summer break" mode already, and really wanted to play the Cookie Clicker game. As I was chatting with the teacher over lunch (including a quip that these kids will probably replace me at work in 15 years), it came out that I played percussion in high school and had fast hands; the kids caught onto this, and soon I was recruited to click on everyone's cookies. (I was wondering why the kids were talking about buying grandmas, which apparently you can do in this game with so many cookies, and quipped to the teacher that whatever this site is needs to be added to the school proxy's blacklist. :-P) It was a darn shame that I couldn't put my test automation skills to work here: as someone who is now doing Web UI testing for a living, I could have written them a really good script to click on that cookie faster than they could ever dream. Sadly, the IT permissions on these computers prevent them from installing any new software.
On the way out, the kids presented me with this neat booklet containing thank-you letters thanking me for spending time with them to teach Arduino. It was a sweet gesture that a couple of them actually brainstormed, created, and put together for me. I also told the teacher to devote some time to teaching them how to count in base 2 so they'll be better prepared for my explanations on why certain things happen, and possibly when it comes time to read & write values from & to entire output ports on the ATmega chips.


Comments
Post a Comment